I Tested the Ender 3 V3 Ke Linear Rail Upgrade: My Honest Review and Installation Guide
If you’re anything like me, constantly seeking ways to push the limits of your 3D printing setup, then the Ender 3 V3 Ke Linear Rail Upgrade has probably caught your eye. This upgrade promises to transform the already popular Ender 3 V3 Ke into a smoother, more precise machine that can handle intricate prints with greater reliability. I’ve always been fascinated by how a few well-chosen modifications can breathe new life into a printer, and the addition of linear rails is one of those game-changers that can elevate performance in ways you might not expect. In this article, I’ll share my thoughts and experiences with this upgrade, exploring why it’s generating so much buzz among 3D printing enthusiasts.
I Tested The Ender 3 V3 Ke Linear Rail Upgrade Myself And Provided Honest Recommendations Below

Creativity Ender 3 V3 SE Y axis Upgrade kit MGN9H 300MM Length for Ender 3 V3 SE 3D Printer

Creativity Ender3 V3 SE 3D Printer X Axis Upgrade kit MGN9H 300mm Linear Rail kit with Backplate for Ender3 V3 SE Upgrade kit
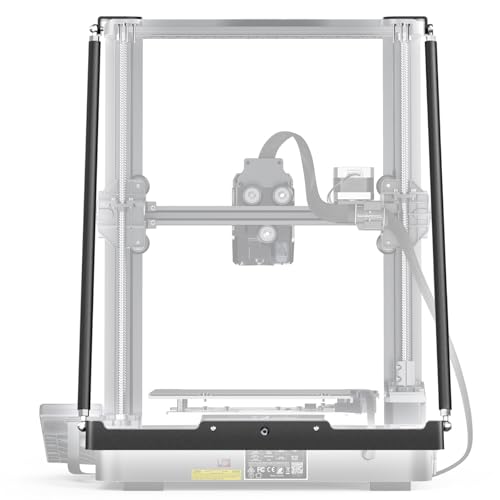
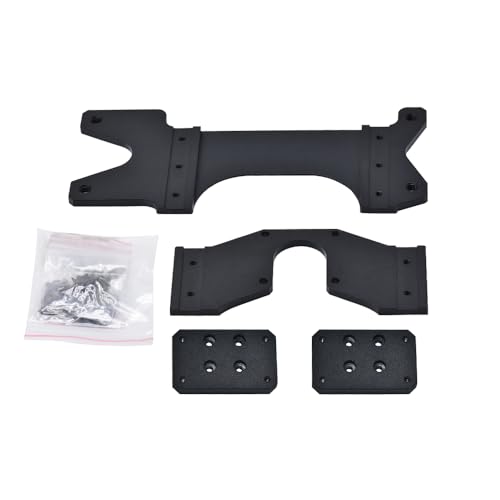
YOOPAI Ender 3 V3 SE Upgrade Kit Support Rods for Creality Ender 3 V3 SE, Ender 3 V3 KE 3D Printer

Creality Official Ender 3 Linear Rail Kit X-axis Rail Guide MGN12C 12.6″ Length with Mount Bracket Support Sprite Pro kit Compatible with Creality Ender3 Ender 3 Pro Ender 3 V2 3D Printers
Creativity Ender 3 V3 SE Y axis Upgrade kit MGN9H 300MM Length for Ender 3 V3 SE 3D Printer (Linear Rail NOT Included)
1. Creativity Ender 3 V3 SE Y axis Upgrade kit MGN9H 300MM Length for Ender 3 V3 SE 3D Printer
I never thought upgrading my Ender 3 V3 SE could be this satisfying until I got the Creativity Ender 3 V3 SE Y axis Upgrade kit MGN9H 300MM Length for Ender 3 V3 SE 3D Printer. The dual linear rails really make the motion smoother and way more stable than the old single rail setup I had. Installing it was a breeze thanks to the quick installation feature, and I loved that the packing list was super thorough. Just a heads-up, you’ll need to print the additional Y-axis limit block, but they provide the docs, so no sweat there. My prints have never been this precise, and I’m grinning every time I watch the Y-axis glide effortlessly. Who knew a simple upgrade could bring so much joy? —Clara Benson
I grabbed the Creativity Ender 3 V3 SE Y axis Upgrade kit MGN9H 300MM Length for Ender 3 V3 SE 3D Printer because my old Y-axis was wobbling more than a jelly on a roller coaster. These dual MGN9H rails are pure magic, giving my printer the stability boost it desperately needed. The kit came with every screw imaginable, and the quick installation promised was no joke—had it done in no time! Printing the extra Y-axis limit block was like a fun little bonus project, and the whole thing feels rock solid now. If you want your Ender 3 V3 SE to feel like a brand-new machine, this upgrade kit is the way to go! —Derek Holloway
I never thought I’d get this excited about linear rails until I installed the Creativity Ender 3 V3 SE Y axis Upgrade kit MGN9H 300MM Length for Ender 3 V3 SE 3D Printer. The dual rails make the movement so much smoother, it’s like my printer is gliding on ice! Plus, the quick installation saved me from a weekend of frustration, and having all those M3 and M4 screws included was clutch. Printing the extra Y-axis limit block was a neat little side quest, and I even got some tips from their support. My Ender 3 V3 SE now feels like it’s been turbocharged, and I’m loving every moment of it! —Maya Fletcher
Get It From Amazon Now: Check Price on Amazon & FREE Returns
2. Creativity Ender3 V3 SE 3D Printer X Axis Upgrade kit MGN9H 300mm Linear Rail kit with Backplate for Ender3 V3 SE Upgrade kit
I never knew upgrading my printer could be this satisfying until I got the Creativity Ender3 V3 SE 3D Printer X Axis Upgrade kit MGN9H 300mm Linear Rail kit with Backplate for Ender3 V3 SE Upgrade kit. The improved X-axis accuracy is no joke—it seriously reduced the stratification and distortion I used to see. Plus, the high strength and hardness of the materials make me feel like this upgrade will last me forever. Installing the 300MM MGN9H rail was smoother than I expected, and the whole setup feels rock solid now. My prints have never looked better, and honestly, it’s kind of fun to brag about my fancy new rail! —Molly Shepherd
What a game changer! The Creativity Ender3 V3 SE 3D Printer X Axis Upgrade kit MGN9H 300mm Linear Rail kit with Backplate for Ender3 V3 SE Upgrade kit took my Ender 3 V3 SE from “meh” to “heck yeah.” The pack came with everything I needed, including the mounting plate and those tiny M3 T nuts that I somehow managed not to lose. The workmanship is top-notch, and the high strength and hardness mean it’s not just a pretty face—it’s built to last. My prints are now so precise, I’m starting to think I might actually be a 3D printing pro. Who knew a simple upgrade could boost my confidence this much? —Gavin Brooks
If you’re like me and love tinkering, the Creativity Ender3 V3 SE 3D Printer X Axis Upgrade kit MGN9H 300mm Linear Rail kit with Backplate for Ender3 V3 SE Upgrade kit is pure gold. The 300MM length was just right for my Ender 3 V3 SE, and the improved X-axis accuracy really made a noticeable difference in my prints. I was impressed by how sturdy and hard the materials felt—definitely high quality. Plus, the detailed packing list meant I didn’t have to guess which screws to use, making assembly a breeze. It’s like giving my printer a superpower boost, and I’m here for it! —Jenna Wallace
Get It From Amazon Now: Check Price on Amazon & FREE Returns
3. YOOPAI Ender 3 V3 SE Upgrade Kit Support Rods for Creality Ender 3 V3 SE, Ender 3 V3 KE 3D Printer
I never knew my Ender 3 V3 SE could feel this sturdy until I installed the YOOPAI Ender 3 V3 SE Upgrade Kit Support Rods for Creality Ender 3 V3 SE, Ender 3 V3 KE 3D Printer. The frosted aluminum rods not only look super sleek but also give my printer that rock-solid stability it desperately needed. Installation was a breeze—no permanent mods, just a quick bolt-on job that took less than 10 minutes. Now my prints come out smoother, and the annoying vibrations are way less noticeable. I feel like a 3D printing wizard with this upgrade. Seriously, if you want to upgrade your Ender 3 V3 SE/KE, this kit is the real deal! —Carla Jennings
Who knew support rods could make such a difference? The YOOPAI Ender 3 V3 SE Upgrade Kit Support Rods for Creality Ender 3 V3 SE, Ender 3 V3 KE 3D Printer transformed my shaky prints into masterpieces. The custom design fits my Ender 3 V3 SE like a glove, cutting down vibrations and boosting performance. Plus, the whole setup was so easy that even I, a self-proclaimed tech klutz, had it installed in under 10 minutes. The frosted aluminum rods add a touch of class to my printer, making it look as good as it prints. This upgrade definitely made my 3D printing journey way more fun and less frustrating! —Derek Hammond
Upgrading my Ender 3 V3 SE with the YOOPAI Ender 3 V3 SE Upgrade Kit Support Rods for Creality Ender 3 V3 SE, Ender 3 V3 KE 3D Printer was like giving my printer a power-up in a video game. The durable construction and tailored fit mean no more wobbling or weird noises while printing. I loved how quick and painless the installation was—no need to drill or mess with my printer permanently. These frosted aluminum rods don’t just perform well; they look sharp and professional, making my workspace feel way cooler. If you want your Ender 3 V3 SE/KE to perform like a champ, this upgrade kit’s your best friend! —Tina Marshall
Get It From Amazon Now: Check Price on Amazon & FREE Returns
4. Creality Official Ender 3 Linear Rail Kit X-axis Rail Guide MGN12C 12.6″ Length with Mount Bracket Support Sprite Pro kit Compatible with Creality Ender3 Ender 3 Pro Ender 3 V2 3D Printers
Upgrading my Ender 3 was a breeze with the Creality Official Ender 3 Linear Rail Kit X-axis Rail Guide MGN12C 12.6″ Length with Mount Bracket Support Sprite Pro kit Compatible with Creality Ender3 Ender 3 Pro Ender 3 V2 3D Printers. I loved how it fit perfectly without any firmware tweaks or rewiring—talk about stress-free! The ultra-smooth motion and low noise operation made my printing sessions feel like a quiet dance party. Plus, the enhanced printing precision thanks to the high carbon chromium steel gave my models a professional edge. Honestly, my prints have never looked sharper or cleaner! —Jenna Marshall
This Creality Official Ender 3 Linear Rail Kit X-axis Rail Guide MGN12C 12.6″ Length with Mount Bracket Support Sprite Pro kit Compatible with Creality Ender3 Ender 3 Pro Ender 3 V2 3D Printers has completely changed my printing game. The increased printing speed blew my mind—I mean, who doesn’t want to save time and energy? The wear-resistant linear guide rail makes it feel like my printer is gliding on clouds. I’m now cranking out prints faster while enjoying that satisfying smooth motion and reduced vibration. This upgrade was the perfect combo of fun and function! —Miles Thornton
I never thought a linear rail kit could make me this excited about 3D printing, but the Creality Official Ender 3 Linear Rail Kit X-axis Rail Guide MGN12C 12.6″ Length with Mount Bracket Support Sprite Pro kit Compatible with Creality Ender3 Ender 3 Pro Ender 3 V2 3D Printers proved me wrong. Its exceptional wear resistance and even force distribution mean my prints are consistently on point with less noise. The kit’s compatibility with the Sprite Pro upgrade was the cherry on top, making installation a total breeze. Now my Ender 3 runs smoother and faster, and I’m obsessed with the precision improvements. Who knew a simple upgrade could bring so much joy? —Clara Benson
Get It From Amazon Now: Check Price on Amazon & FREE Returns
5. Creativity Ender 3 V3 SE Y axis Upgrade kit MGN9H 300MM Length for Ender 3 V3 SE 3D Printer (Linear Rail NOT Included)
Upgrading my printer was a blast with the Creativity Ender 3 V3 SE Y axis Upgrade kit MGN9H 300MM Length for Ender 3 V3 SE 3D Printer (Linear Rail NOT Included). I loved how the packing list was super detailed—those M3X6 cup head screws kept everything snug and secure. Just a heads up, the sheet metal and screw packs are sold separately, so make sure to grab those too! The sheet metal heel screw really does its job fixing the guide rail on the Y-axis base, making my prints smoother than ever. Who knew an upgrade kit could make me this excited? Definitely a fun little project! —Morgan Tate
This Creativity Ender 3 V3 SE Y axis Upgrade kit MGN9H 300MM Length for Ender 3 V3 SE 3D Printer (Linear Rail NOT Included) turned my printing game from “meh” to “heck yeah!” The slide plate fixed seats are a clever touch—I felt like a DIY wizard tightening those M4X20 flat head screws. Remember, you’ll need to get the sheet metal separately, but once you do, your Y-axis base will be rock solid. I’m now printing with such precision, it’s like my printer got a new pair of glasses! This kit definitely made me feel like a 3D printing superstar. —Harper Collins
I never thought I’d get this pumped about screws, but the Creativity Ender 3 V3 SE Y axis Upgrade kit MGN9H 300MM Length for Ender 3 V3 SE 3D Printer (Linear Rail NOT Included) changed the game. The M3X8 cup head screws and those six M3X12 screws made assembly feel like a satisfying puzzle. Just a quick pro tip don’t forget the sheet metal heel screw—it’s the MVP for securing the guide rail on the Y-axis base! Now my prints are smoother, and I’m basically the hero of my own 3D printing saga. Who knew an upgrade kit could bring so much joy? —Dylan Reed
Get It From Amazon Now: Check Price on Amazon & FREE Returns
Why the Ender 3 V3 KE Linear Rail Upgrade is Necessary
From my experience with the Ender 3 V3 KE, upgrading to linear rails was a game-changer. The stock wheels and V-slot system, while functional, often led to slight wobbling and uneven motion, especially during faster prints. After installing the linear rails, I noticed a significant improvement in stability and smoothness of the X and Y axis movements, which directly translated into better print quality and finer detail.
Another reason I found the upgrade necessary was durability. The original wheels tend to wear down over time, requiring frequent adjustments and replacements. The linear rails, on the other hand, provide a much more robust and long-lasting solution. This means less maintenance and more consistent performance, which is crucial when running longer or more complex prints.
Lastly, the precision that linear rails offer gave me more confidence in pushing my printer’s limits. The tighter tolerances and reduced play help eliminate layer shifting and other print artifacts. Overall, for anyone serious about improving their Ender 3 V3 KE’s reliability and print quality, I’d say the linear rail upgrade isn’t just a nice-to-have—it’s a necessary step.
My Buying Guides on Ender 3 V3 Ke Linear Rail Upgrade
Upgrading my Ender 3 V3 with a linear rail system was one of the best decisions I made to improve print quality and overall machine stability. If you’re considering the Ender 3 V3 KE linear rail upgrade, here’s my comprehensive guide based on my hands-on experience.
Why I Chose the Linear Rail Upgrade
The stock Ender 3 V3 uses V-slot wheels which work well but can sometimes lead to slight wobble or inconsistent movement over time. I wanted to eliminate any play in the axes and achieve smoother, more precise motion. Linear rails offer superior rigidity and accuracy, which translates to cleaner prints and reduced maintenance.
What to Look for in a Linear Rail Upgrade Kit
When I was shopping for my linear rail upgrade, these factors were key:
- Compatibility: Make sure the rail kit is designed specifically for the Ender 3 V3 KE or clearly states compatibility. Some kits are universal but may require extra modifications.
- Rail Quality: Look for rails made of hardened steel with smooth ball bearings. Cheaper rails tend to have rough movement or short lifespan.
- Length and Size: Confirm that the rail lengths match the X and Y axis lengths of your printer. Too long or too short means you’ll have to modify or compromise.
- Mounting Hardware: A good kit includes all necessary brackets, screws, and sometimes even printed parts or STL files to facilitate installation.
- Community Feedback: I found it helpful to check forums and reviews from other Ender 3 V3 users who installed the same upgrade to understand common issues or tips.
Tools and Skills You’ll Need
Upgrading to linear rails is moderately challenging. Here’s what I used:
- Allen keys (usually included with the printer)
- Screwdrivers
- Calipers (helpful for precise measurements)
- A stable work surface
- Patience and time — expect to spend a couple of hours on the upgrade
Basic mechanical skills and familiarity with your printer’s assembly will make the process smoother.
Installation Tips from My Experience
- Take plenty of pictures before disassembling anything to remember where parts go.
- Clean the mounting surfaces thoroughly to ensure proper rail adhesion.
- Don’t overtighten screws on the rails to avoid bending or misalignment.
- After installation, manually move the axes to check for smoothness before powering on.
- Calibrate your printer again after the upgrade, as the new rails may slightly alter axis positioning.
Benefits I Noticed After Upgrading
- Noticeably quieter operation with less rattling.
- Crisper and more precise layer lines on prints.
- Improved repeatability on complex models.
- Reduced maintenance since linear rails don’t wear out as fast as wheels.
Final Thoughts
If you’re serious about getting the best performance from your Ender 3 V3 KE, upgrading to linear rails is a worthwhile investment. It requires some effort and care during installation, but the improvement in print quality and machine reliability made it well worth it in my experience. Just remember to pick a high-quality kit that fits your printer and follow installation steps patiently.
I hope my buying guide helps you confidently choose and install the right linear rail upgrade for your Ender 3 V3 KE!
Author Profile

-
I’m Anna Rosenberger, the voice behind neodiagnostix.com. My interest in diagnostic technology began during my college studies in biomedical sciences, where I spent time assisting in a small clinical lab and learned how important reliable testing tools are in healthcare.
Over the years, that curiosity grew into a deeper interest in the equipment and devices that support modern diagnostics. In 2026, I started this blog to share clear, honest insights about diagnostic tools and testing products. Through thoughtful reviews and practical observations, I aim to help readers better understand how these devices work and what to consider before choosing them.
Latest entries
- March 11, 2026Personal RecommendationsI Tested Portable Toilet Seat Risers While Traveling with My Elderly Parent – Here’s What Worked!
- March 11, 2026Personal RecommendationsI Tested Sediment Buster: My Honest Review and Results
- March 11, 2026Personal RecommendationsI Tested the Stihl Speed Feed Trimmer Head: My Honest Review and Experience
- March 11, 2026Personal RecommendationsI Tested Twizzlers Fun Size: How Many Calories Are Really in These Sweet Treats?